Intro:
This troubleshooting guide was written to accompany the offshore
spares kit. This kit has been designed to include the most often lost or broken parts, based on
6 years of experience with our customer's motors. The kit does not include a replacement motor head,
motor, motor controller, or throttle assembly, although these components are available in our online
store. The Offshore spares kit does include the following.
ATool kit:
aBattery terminal wrench
bTorx bits and bit driver handle
cDielectric grease
dCotton swabs
eEpoxy
BMagnetic safety key
CPropeller kit
DTilt pin
ETransom lock
FClamp screw assembly
GMotor head mounting clamps
HReverse latch kit
IBattery cable with connector*
JBattery extension cable with connectors*
KBattery screw kit
LConnector conversion kit for motors made before 2023
M12V boost converter to allow EP Carry to operate from a 12V battery.
NAC charger with adapter*
OThrottle knob kit
PTroubleshooting guide
QDry bag
* For motors delivered in 2023 or later. A conversion kit is included in the offshore spares kit so that older motors can be updated with our improved connector system. This conversion kit requires removal of the old motor connector and soldering the new connector in place. If you cannot do this yourself, we can convert your older motor at our factory. If you would prefer this option, you can save on shipping by removing and sending just the motor head / tiller arm.
This troubleshooting guide has two parts: Troubleshooting and Procedures. When you have a problem, read through the troubleshooting guide to identify the problem, and refer to procedures as indicated. Note that when replacement parts are needed, most are included in the offshore spares kit. All parts are separately available in our store.
Troubleshooting:
Noisy operation
- EP Carry has a gear reduction in the lower unit much like a gasoline outboard. The gear reduction is a large part of why EP Carry is 2x more efficient than direct drive pod motors. With a gas motor, gear vibrations are drowned-out by combustion but not so with electrics. Generally, inflatables or heavily built boats are inefficient in converting vibrations into sound so they are quieter. But others, especially lightweight fiberglass and epoxy bonded plywood boats convert vibrations into sound quite efficiently. Adding thickness to the transom mounting area of your boat can help reduce the production of sound.
If the sound has increased suddenly or over time, this can indicate material trapped in gear module or a worn prop module. Removal of the prop and inspecting for debris is a good first step. The second step is to measure play in the propeller to assess propeller module wear. If play is excessive, a new prop module is needed. P 1.0: Removal check, and replacement of prop module, P1.1 Check for wear, P1.2 Prop replacement. Part C Propeller kit
Motor pops up in reverse or won't rise.
- A reverse latch is required on all outboards with a selectable reverse function to prevent the
motor from tilting up when the motor is producing reverse thrust. Other reverse latch designs
require the operator to remember to engage and disengage this latch manually. EP Carry has a
unique and patented automatic reverse latch to make things easier when beaching and launching.
This feature releases the latch with a tug on the tiller arm (note: pull slightly upwards when
raising the motor. Any downward force on the tiller arm will inhibit raising of the motor).
The latch also releases when grounding. When this release procedure does not work, it is either
due to pressing down while pulling, salt build-up in the mechanism, or too much tension on the pivot
bolt nut. First step is to make sure that you are
pulling slightly upward. Second step is to rinse the clamp tilt area with fresh water to remove
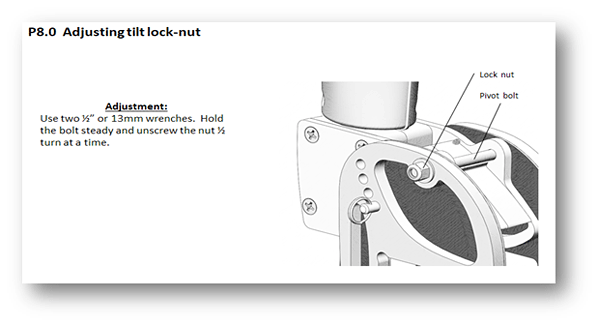
salt build-up. If that is ineffective in resolving the issue, ease the pivot bolt tension by
unscrewing the lock nut ½ turn and checking for proper function. 8.0 Adjustment of
pivot lock nut tension. If the latch still won't release, disassembly and cleaning may be needed.
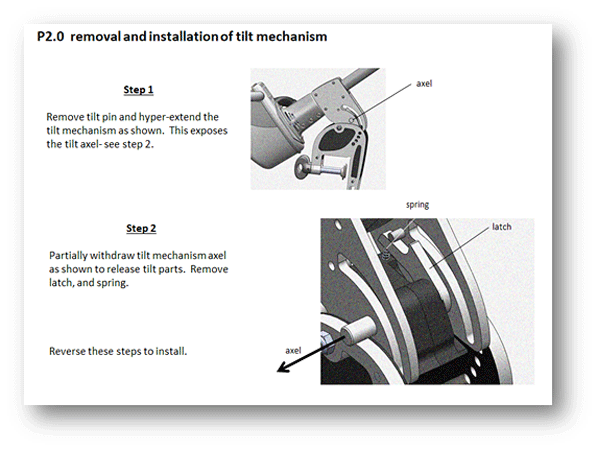
- If the problem is the opposite– i.e. releasing too easily in reverse, the spring loaded metal latch may be worn and in need of replacement. See 2.0 removal and installation of tilt mechanism.
- When the transom angle adjust pin is removed, the EP Carry tilt assembly can become over-extended. Over-extension can allow normally secured tilt parts to fall free from the motor and become lost. Replacement parts are available. P2.0 removal and installation of tilt mechanism. Part H Reverse latch kit.
Motor and lower unit are not pointing the same direction. And/or, if the motor
runs but prop does not turn:
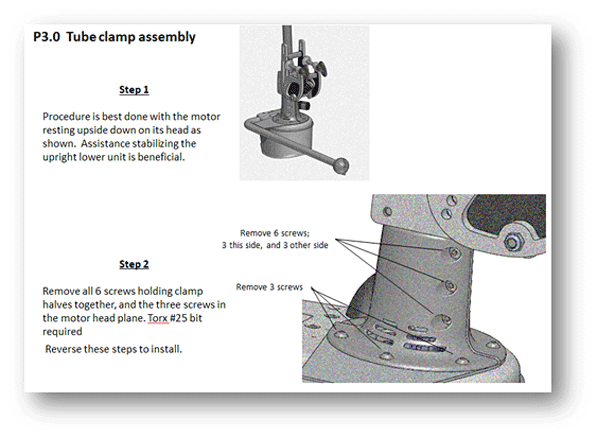
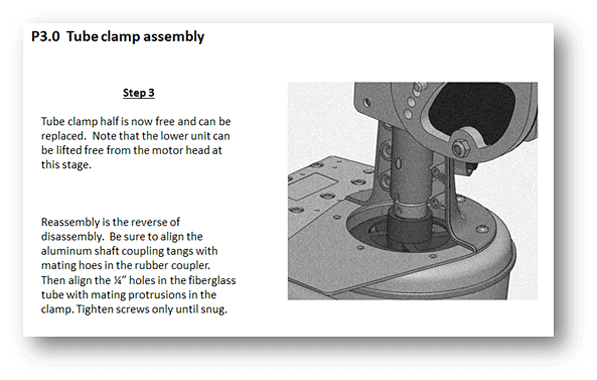
- Early EP Carry outboards had some incidence of motor head mounting assembly breakage which can cause the motor head to twist with respect to the lower unit. When this happens, the drive shaft coupling can also become disengaged. This issue has been resolved in units manufactured since 2019. For current production units, head mounting assembly replacement is only needed when addressing breakage due to extreme impacts. The tube clamp assembly consists of two identical glass reinforced plastic parts that connect the fiberglass torque tube to the motor head. The tiller arm rest plate is secured between these clamps and the motor head. 3.0 Assembly of tube clamp assembly. Part G Motor head mounting clamps.
Throttle handle comes loose from the tiller tube.
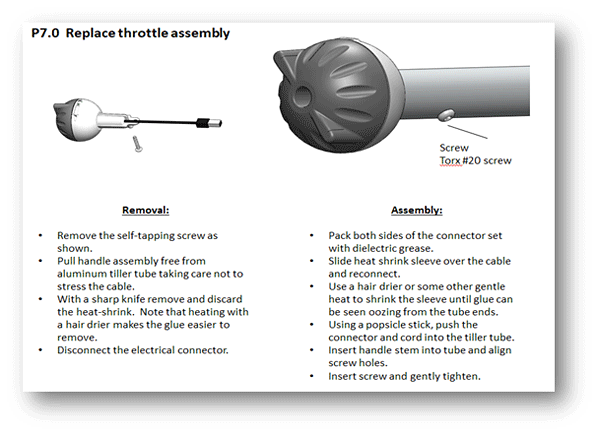
- In early EP Carry motors, the throttle handle was held in place with a screw that passed through the aluminum tiller arm and threaded into a hole in the throttle handle stem. This was a weak point due to pull-forces when raising the motor near the beach. All motors delivered from 2022 on have a longer screw that passes into the far side of the aluminum tube and this change prevents failures. If a breakage occurs in an older motor, the throttle is still functional but loose in its socket. The recommended repair is to epoxy the throttle to the tube. Part A Tool kit.
Motor does not wake up.
99% of the time this problem is related to not following these 4 steps.
- The battery must be at least partially charged.
- Battery must be properly connected to the motor.
- The magnetic safety key must be fully inserted.
- The throttle must be placed in the off positon for 3 seconds or more.
If your EP Carry does not function properly when meeting these conditions, continue with the following check-list.
This check list must be executed in order.
Skipping steps will result in an incorrect diagnosis.
- Listen for the motor.
•If the motor can be heard but there's no propeller movement, and if the propeller can be easily turned by hand, see Broken Motor Head Mounting above.
•If the motor makes a hum but the propeller cannot be turned by hand, proceed to step 2.
•If there is no motor sound, proceed to step 3.
- Remove the propeller and try to run the motor again. If the brass gear inside the propeller cavity is turning, examine the prop for debris between gear teeth. Replace prop and check operation. P1.2
Removal and replacement of prop module. If the brass gear did not turn, remove the motor head and turn the motor shaft by hand.
P3.0 Tube clamp assembly. If it turns, try the lower unit shaft. If the lower unit shaft is jammed, flush the entire lower unit with water to dislodge materials that may have jammed the works. If the motor head shaft does not turn, the motor head must be replaced. If everything turns freely, but the motor still fails to operate, proceed to step 3. Note all the following steps can be done with the motor head removed.
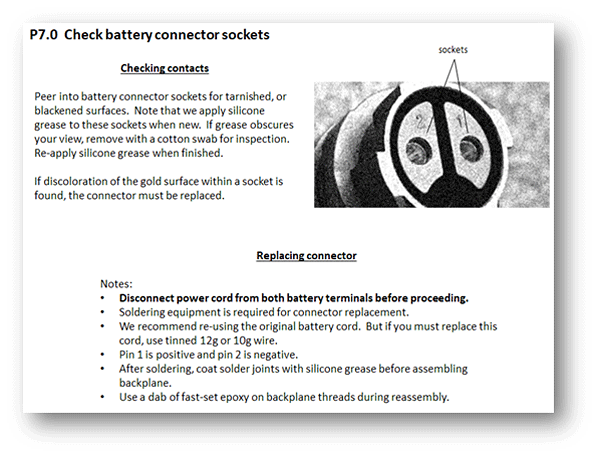
- Battery connector: Check that all sockets in the battery connector are shiny gold in color. If so, fill sockets with silicone grease, plug in, and try again. P7.0 Checking battery connector sockets. If sockets are anything but gold in color, remove all signs of debris with nothing more aggressive than a cotton swab. If cleaning with a cotton swab does not produce a shiny gold surface, gold plating has been etched away. In this case the battery cord and connector must be renewed to prevent heating and possible damage to the mating connector on the motor head. Part i Battery cable kit.
- Use a DC volt meter to measure voltage on battery terminals. If the battery voltage is under 19V proceed to the next step. If battery voltage is below 21V but higher than 19 V, place battery on charge. If the charger light turns green in under 10 minutes, proceed to step 5. If the charger light remains red, allow it to completely charge until the light turns green and verify that your battery voltage is greater than 28V. Try your motor again. If the motor still fails to operate, skip to step 6.
- If the battery voltage is below 19 volts, the battery may be bad. K2 Energy batteries have only failed when not re-charged soon after a complete discharge. This can be due to forgetting to recharge, or it can be due to a poor connection to the charger, in which case the charger falsely indicates a full charge. If battery voltage is below 19V, perform 4.0 Charger check procedure, and then try recharging. If this does not resolve a low voltage battery issue, replace the charger– Part N; AC charger with adapter. If the new charger does not improve battery voltage, a new battery is needed. You can use a 24V or 36V battery of any type to run your EP Carry. If no replacement 24V or 36V battery options are available in your area, use the 12V boost converter Part M 12V boost converter with any 12V battery.
- Inspect the magnetic key for signs of corrosion at the end that goes into the throttle hole. It is common for this surface to collect magnetic sands so clean with a cloth and inspect for a rusty hole in that area. If rusty, replace the key. Part B Magnetic safety key. If the motor still fails to respond, proceed to step 7.
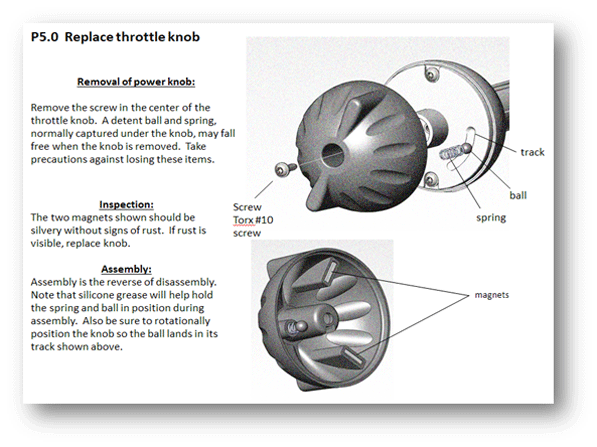
- Remove the throttle knob. Be careful to not lose the center screw, detent ball and spring. Inspect magnets on the backside of the knob. If they appear rusty, replace the knob and try again. P5.0 Replace throttle knob. Part O throttle knob kit.7. If knob magnets are shiny, re-assemble and test again. If it still does not work, go to step 8. If knob magnets are shiny, re-assemble and test again. If it still does not work, go to step 8.
- Nearly every motor that reaches this point in the troubleshooting guide has been accidentally submerged either for more than 10 min in water less than a foot deep, or in deeper water. If your testing has not found a solution by this point, and if your motor has not been submerged, go through the steps again just to make sure. Whether submerged or not, if the same non-functioning result is found, continue.
- Check to see that the controller is functioning: Enable Bluetooth in the motor by following the process: P6.0 Installing higher power firmware. If you are able to see PropEl in the list of Bluetooth devices when using the NRF Connect app, the controller and throttle are operating correctly and the BLDC motor is in need of replacement. We have only seen cases of the BLDC motor needing replacement when the motor head has been submerged- this failure can take months to manifest. The BLDC motor is not included in the offshore spares kit but is available separately. If the Bluetooth identifier PropEl cannot be found than replace the throttle. P7.0 Replace throttle assembly and try again. If PropEl is still not found, order a replacement motor head.
Motor runs with the key removed, or runs without throttle commands.
- This has only happened in association with a submerged motor. This problem is due to a fault in the throttle handle. Replace and re-test. P7.0 Replace throttle assembly. If no improvement, attempt to re-install firmware. P6.0 Installing higher power firmware. If this does not correct the problem, the motor head must be replaced.
Procedures:
P6.0 Procedure for updating
firmware- see separate document